October 15th, 2009

Tips: Steak on a Charcoal Grill

Happy day! Super-Cali-Fragilistic Sister-in-Law Chef Sandy weighs in today on the use of a charcoal grill versus gas.

There are some fierce proponents of each. Here, Sandy tells us the ins and outs of using charcoal to cook that gorgeous steak. Enjoy!
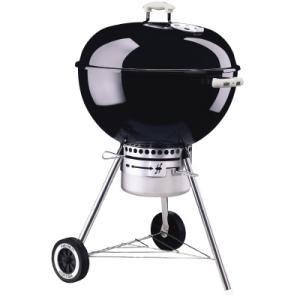
612708f8-61b0-4366-a6cb-5a478b4c60cc_300

Using A Charcoal Grill

Right before Hurricane Ike hit Houston last year, my husband and I decided we needed to have a grill, just in case we lost electricity for a while.  We had left our old gas grill behind when we moved, and had planned on replacing it when we got settled in our new home.  Well, the day before a hurricane hits is no time to buy a grill, we discovered, and we were not able to find a gas grill anywhere in the Houston area.  The only thing we could find was a few bags of charcoal and a camping sized charcoal grill.

Given that there were no other options, we went with the charcoal grill and quickly learned some of the nuances which make this just a little more complicated then firing up a gas grill.  I do feel like I have mastered a few tricks which I would like to share with you, whether you are a new user, or someone who may just do the charcoal thing occasionally, like when you are camping or picnicking at a state park.

If you are a long-time charcoal griller, you’ll probably be familiar with all of this.  My intended audience is those who have not often had success with charcoal, but would like to give it a try.  Gas grills are certainly a convenient option, but if for whatever reason or preference drives you to use a charcoal grill here are some things that might help you have success.

The charcoal grill has two grates — one is intended to support the charcoal at the bottom of the grill, the other is to cook your food on.  The lower grate holds the charcoal up slightly from the bottom of the grill so that oxygen can get to the pile of briquettes.  Use about 6 total sheets of newspaper, rolled tightly into 2 rolls. Form an X at the bottom of the grill with the 2 rolls of newspaper, and place the bottom grate on top of the newspaper to hold it in place.

Next, form a pyramid of the charcoal, so that it will burn efficiently and not require too much starter fluid.  The amount of charcoal you will want to use is limited by the size of the grill, of course, but also should be determined by how much you want to cook.  A couple of burgers may only need something like 30 briquettes, but pounds and pounds of steaks and chicken will take longer to cook, therefore you will need a fire that burns longer — plus more briquettes.

Once you have a nice square pyramid (ask your fourth grader!) squirt the pile with the recommended amount of lighter fluid.  Don’t forget to read the package.  It is usually just a couple-second squirt.  Don’t be that guy who squirts half a bottle of lighter fluid onto a pile of burning charcoal – this is dangerous and foolish and stinks!  Put the top back on the bottle and put it far from the fire, before you light a match.  Light the ends of your paper tubes, which should fairly quickly catch the pile of briquettes on fire.

After about 20 minutes, when the briquettes are covered with ash and the flames have died down, use a fire-proof implement to spread the hot charcoal evenly on the grate.  Please use every safety precaution.  Sparks can and will fly up.  Replace the clean cooking grate on top of the hot charcoal and you are ready to cook.

Enjoy the smokier flavor that charcoal grilling imparts to your food — you may become a convert!

Photo of Weber charcoal grill courtesy of HomeDepot.com.

October 13th, 2009

The Steak Life: Jewelry Edition

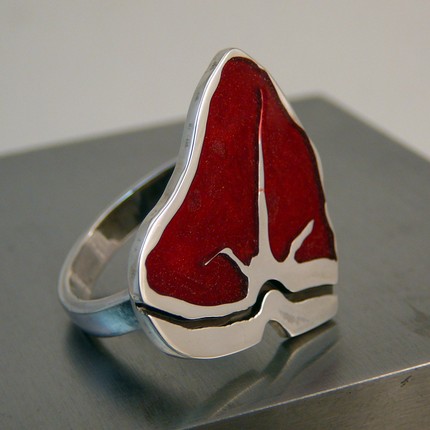
For the girl who has everything . . . well, I’ll bet she doesn’t have this!

steakring

She loves steak. She loves jewelry. She loves you. Why not buy her a ring that says it all?

I mean, who wouldn’t want to advertise their carnivorous desires each and every day? On your digits, no less!

If I had this ring I’d probably just save it for our special outings to steak dinners — or romantic steak meals at home around the dining table. But that’s me.

Hint:  Honey, here’s that holiday gift idea you were asking about.

Photo courtesy of etsy.com.


October 9th, 2009

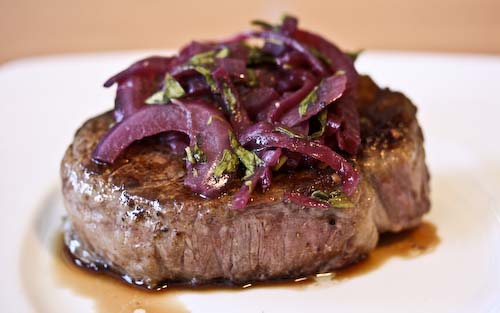
Like Tarragon? Check Out This Filet!

Filet_Mignion_with_Red_Onion_Relish

Oh, beautiful, delicious filet mignon. How I’ve missed you. I’ve been cheating on you. Most of my dates lately have been with ribeyes. I’m sorry. Can you forgive me?

When I think of your tender, juicy goodness I get little pangs of regret that I’ve been lured into choosing the rich, hearty taste of the ribeye.

I don’t know why I do it.

Habit?

Fear?

I don’t know.

Maybe it’s the draw of the cowboy, rogueish, bad boy ribeye. You know a girl can’t resist a bad boy.

But when I see photos of you like this I have to ask myself why. Why don’t I choose you lately? You’re so soft. And tender.

Women need that, too, you know. So, if just for now, I choose you, filet.

I choose YOU.

Filet Mignon with Red Onion and Tarragon Relish

Olive oil for the pan

1 large red onion, peeled and thinly sliced

1 tablespoon sugar

1/2 teaspoons salt

1/2 cup red wine, such as Cabernet Sauvignon or Merlot

1 1/2 tablespoons sherry vinegar

1/2 cup coarsely chopped fresh tarragon

Pepper

2 – 4 filets mignon

Salt and Pepper

Olive oil for the pan

For the Relish

Heat the oil in a medium saucepan over medium heat, then add the onion, sugar and salt. Cook until the onion is soft, but not brown, stirring often. This should take about 5 minutes. Add the red wine and allow the liquid to gently simmer until evaporated, stirring often. About 5 – 10 minutes.

Add the vinegar and tarragon, stirring briefly. Season with salt and pepper, then set aside.

For the Steaks

Season both sides of the steaks with salt and pepper. Don’t hold back, do this like you mean it. Heat the oil in the pan over high heat until the oil starts to smoke. Carefully place the steaks in the skillet using tongs, and cook on the first side for about 4-5 minutes. Flip once that side is a deep brown. Continue to cook on the other side until done to your preference. This was about another 3-4 minutes for me (medium rare).

Transfer the steaks to a warm plate and allow to rest for 5 minutes before serving.

To serve, mound the relish on top of each steak and enjoy.

Notes:

* Remember to bring your steaks to room temperature before cooking so that they heat evenly.

Heavenly photo and recipe courtesy of Cooking-Books.blogspot.com.


You are currently browsing the Steak-Enthusiast.com weblog archives for the year 2009.

Subscribe

Subscribe in a reader
(or) Subscribe via Email


About Me

Hi! My name is Dena P., and I love steak. In fact, I’ve been on a quest for the perfect steak for a few years now.

I love experimenting with food and I like to get my family, friends and neighbors involved. They add a lot to my cooking experience by helping me perfect techniques and sharing recipes.

Read More About Me »

Steak Widget

Archives