October 15th, 2009

Tips: Steak on a Charcoal Grill

Happy day! Super-Cali-Fragilistic Sister-in-Law Chef Sandy weighs in today on the use of a charcoal grill versus gas.

There are some fierce proponents of each. Here, Sandy tells us the ins and outs of using charcoal to cook that gorgeous steak. Enjoy!
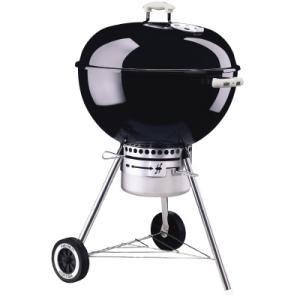
612708f8-61b0-4366-a6cb-5a478b4c60cc_300

Using A Charcoal Grill

Right before Hurricane Ike hit Houston last year, my husband and I decided we needed to have a grill, just in case we lost electricity for a while.  We had left our old gas grill behind when we moved, and had planned on replacing it when we got settled in our new home.  Well, the day before a hurricane hits is no time to buy a grill, we discovered, and we were not able to find a gas grill anywhere in the Houston area.  The only thing we could find was a few bags of charcoal and a camping sized charcoal grill.

Given that there were no other options, we went with the charcoal grill and quickly learned some of the nuances which make this just a little more complicated then firing up a gas grill.  I do feel like I have mastered a few tricks which I would like to share with you, whether you are a new user, or someone who may just do the charcoal thing occasionally, like when you are camping or picnicking at a state park.

If you are a long-time charcoal griller, you’ll probably be familiar with all of this.  My intended audience is those who have not often had success with charcoal, but would like to give it a try.  Gas grills are certainly a convenient option, but if for whatever reason or preference drives you to use a charcoal grill here are some things that might help you have success.

The charcoal grill has two grates — one is intended to support the charcoal at the bottom of the grill, the other is to cook your food on.  The lower grate holds the charcoal up slightly from the bottom of the grill so that oxygen can get to the pile of briquettes.  Use about 6 total sheets of newspaper, rolled tightly into 2 rolls. Form an X at the bottom of the grill with the 2 rolls of newspaper, and place the bottom grate on top of the newspaper to hold it in place.

Next, form a pyramid of the charcoal, so that it will burn efficiently and not require too much starter fluid.  The amount of charcoal you will want to use is limited by the size of the grill, of course, but also should be determined by how much you want to cook.  A couple of burgers may only need something like 30 briquettes, but pounds and pounds of steaks and chicken will take longer to cook, therefore you will need a fire that burns longer — plus more briquettes.

Once you have a nice square pyramid (ask your fourth grader!) squirt the pile with the recommended amount of lighter fluid.  Don’t forget to read the package.  It is usually just a couple-second squirt.  Don’t be that guy who squirts half a bottle of lighter fluid onto a pile of burning charcoal – this is dangerous and foolish and stinks!  Put the top back on the bottle and put it far from the fire, before you light a match.  Light the ends of your paper tubes, which should fairly quickly catch the pile of briquettes on fire.

After about 20 minutes, when the briquettes are covered with ash and the flames have died down, use a fire-proof implement to spread the hot charcoal evenly on the grate.  Please use every safety precaution.  Sparks can and will fly up.  Replace the clean cooking grate on top of the hot charcoal and you are ready to cook.

Enjoy the smokier flavor that charcoal grilling imparts to your food — you may become a convert!

Photo of Weber charcoal grill courtesy of HomeDepot.com.

June 26th, 2009

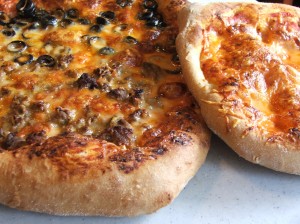
Pizza. Beef. Scrumptious.

We’ve talked about sprinkling your homemade pizzas with the heaven we call beef before. But here’s Sandy’s take on doing it at home with the kids.

What could be more fun than creating a meal this summer with the kids that the whole family will love?

Here’s her story — and her photo (you may drool now) . . .

sandyssteakpizza

Pizza with the Kids

So school’s out for summer where we are, and after a week at Nana’s house, my kids are back in town, and I am back in charge of their fun.  The first “official” day of summer was Monday, and I had great intentions of having my five and nine year olds make Objectives and Goals for the summer.  So it went great…. 

Surprisingly, nothing got resolved, so I have made my own projections of summer ideas and decided that one of the things we can do is work together to make some of our meals.  Somehow, even though it is often more work that way, at least I feel like they are a part of it and we are doing something useful and educational.  Plus I feel a little less like a servant to their needs and more like a developer of their potential as humans.

Although they both like to cook, I am sure that oftentimes they would like to just play with their new videogame system, and the big one can certainly entertain himself in his room with a stack of new books from the library.  But this is my plan!

One of the books I checked out is a giant cookbook, and we have made chocolate chip cookies and pizza together from this book.  I must say that the cookies were extraordinarily good, despite the fact that the only chips I had were the swirled white chocolate/ semi sweet chocolate ones (and I think they’re too sweet).  I even snuck a little healthiness into the cookies (which I am wont to do), by substituting King Arthur White Whole Wheat Flour for part of the all purpose flour called for in the recipe.  The book we got was Baking Illustrated, The Practical Kitchen Companion for the Home Baker by the editors of Cooks Illustrated Magazine and the recipe was for Thick and Chewy Chocolate Chip cookies.  The interesting thing about the book is that it has a little essay, for want of a better word, before each recipe, detailing how it is they came to it.  What they started with, how they tweaked the recipe, what each small change did to the final outcome. 

So my nine year old read the essay, which is kind of a description of the scientific method, when I think of it.  It explained why they used melted butter instead of whole butter, the ratio of brown to white sugar they used, and so forth.  The same basic ingredients as the standard back of the package recipe, but the ratios were tweaked a little, and I must say that they were some tasty, good looking cookies.  So I can call this a science lesson, too, right?

Then last night, we made pizza together.  My big boy helped me make the dough, measuring ingredients and turning on the standing mixer.  He also shaped the finished dough into a ball and helped make the pizza crust.  I taught him how to dice an onion, which he then sautéed with the sausage and ground beef topping.  The five year old helped us top the pizza and made sure we made one with her favorite toppings (olives!).  They were some gorgeous looking pizzas, despite the fact that I do not have a pizza stone in my oven and I do have the worlds’ worst oven to work with.  It is totally unreliable, as far as temperature goes, and has no insulation, which means that in the Houston summer, it is insane to make pizza.  Insane but good.  It must have been 125° in the kitchen by the time we were done – the oven was preheated to 500° for 30 minutes, and I am telling you our oven has no insulation on it – you could fry an egg on the top of it.  So my new plan for pizza making in the summer is to get another pizza stone (I had one for years and just haven’t replaced it after it cracked) and put it on the grill, where I will get it fiery hot, by preheating, then put the pizza on top and let it cook with the top on the grill for 6-10 minutes.  I have tried doing pizza right on the grill grate, but I am yet to end up with a satisfactory product.  The bottom crust gets too burned for my taste, and I end up cutting it off, which is not easy, nor pretty.

The picture of the pizza in the cookbook (which has gorgeous illustrations and pictures) was of a much thinner crust than we were able to accomplish.  This is something we’ll have to practice technique on, but this is definitely the best pizza we have ever made at home.  It was tasty, the crust was delicious if not perfectly round.  Thinner crust is more popular with my family, particularly my husband, so we will have to get our crust shaping technique down to more of a science.  The one thing I really noticed besides its yumminess is that I did not notice all of the salt that I get from takeout pizza.  Ever notice that an hour or so after takeout pizza, you are so thirsty you can hardly stand it?  Our pizza had kind of the opposite issue.  I almost wish it had a little more salt – I will probably add a titch more to the dough recipe next time, and maybe go with a non-organic mozzarella which may have made it a little bland.  All said, a pretty good week in cooking school ala Mom.


June 25th, 2009

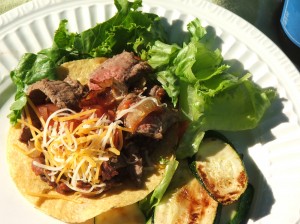
Steak Chalupas!

So, we’ve been talking a lot about what to do with leftover steaks. Sister-in-law Chef Sandy has a fantastic idea for steak chalupas you can make from any steak you have in the fridge.

Check out what she has to say!

holymolysteakchalupas

Leftover Steak Chalupas

When I cook, I like to cook green and thriftily.  Healthy, conscious of our environment, not wasteful of food or energy resources (or my own efforts.)  So if I am firing up the grill, I like to make sure that I am using most of the square footage (square inchage, to be exact…) of the heated grill grate.  Often times we end up with leftovers, which just happens to make the next nights’ dinner easier, right?  Who can argue with that? 

This week we had t-bone steaks from the grill one night, standard meal with baked potato and salad.  I had purchased an extra one, knowing exactly how much would fit on our grill.  The one very large t-bone that I knew was going to be leftover from our meal I took off the grill a little early – a little rare for our liking, because I knew it was going to be heated up when it made an appearance later in the week.

Two nights later, when time was short and everyone was hungry, I just had to heat up some chalupa shells in the oven for 5 minutes, heat up some black beans with salsa in the microwave and toss together a quick Mexican-inspired salad to make a tasty treat.  I did sauté some onions, and would have added a bell pepper if I had had one handy, then while they were cooking I sliced up that leftover steak and added it to the hot skillet just for a second to warm up the meat. 

Dena here again. I always marvel at how Sandy (and so many of you!) can think outside the box. I love the standards, but I can easily get stuck making the same things over and over again.

Boring, right?

That’s why I need this blog. And Sandy. And you. To help me keep it fresh and interesting around here.

Thanks for the ideas!!


Archives