We know salt flavors/seasons/prepares our food — especially steak.
But what do we REALLY know about salt?
As for me, I’d have to say, “Not a lot.”
Super Sister-in-Law Chef Sandy to the rescue. Here’s her lesson for me on the uses and origins of the various salts.
Class is in session!
Salt
When we were cooking together in Florida, Dena asked me a few questions about what salt to use and why. I generally always use kosher salt when I am cooking, and sometimes use sea salt. Why? I am a situational learner. When I was in culinary school (this was in the time before there was the Food Network) and in one of my very first introductory classes what we did is really taste some of the ingredients that we used. Seems silly to taste salt, right? We all know what it tastes like. But do you really know?
Try a test: Go to your nearest gourmet grocer, or any store that has some spices and salts in the bulk aisle. Get a tablespoon of each of them. I bought three beautiful, unusual salts yesterday, and the prices listed on the jars were between $6.99 and $29.99 a pound. But since I only got a little of each it cost less than $2.00 for all of them. I also bought a 2 pound box of kosher salt, while I was there, because I go through about 2 a year. Kosher salt is also a little more expensive than the usual stuff in the round cardboard container; it cost $2.39 for a 2 pound box. But over the course of a year, it really does not make a financial impact.
Put a few grains of each salt on a small plate and even visually you will notice a difference between different salts. Kosher salt is a bigger grain, and has nothing added to it. It also is certified free of pests, which cannot be a bad thing. One of the reasons chefs use kosher salt is that it is physically easy to use. I keep a plastic 1 cup container with an easily replaced lid right next to where I cook. When I am cooking, the lid is off and I use my scrupulously clean hands to grab a pinch to season what I am cooking. I know instinctively by feel what the right amount is (more on this later). About the taste of kosher salt. It tastes like salt. Duh. But it does not have any chemical flavor. And it is considerably less salty than the other alternatives. One teaspoon of kosher salt is about equal in saltiness to 1.5 teaspoons of iodized salt or 2 teaspoons of sea salt (depending on its consistency.)
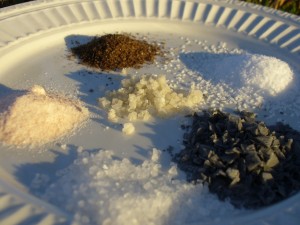
From top, in clockwise direction: Alderwood Smoked Salt, Kosher Salt, Cyprus Black Lava Flake, “regular”coarse sea salt, Himalayan Pink Mineral Salt, and in the center, Sel Gris (natural grey sea salt from France)
Take a look at the iodized salt on the plate. It has an obviously finer grain than the kosher salt, which means that it is harder to grasp just the right amount, and harder to distribute it nicely and evenly on a piece of meat (or whatever you are cooking.) If you taste iodized salt right before or after kosher salt you will notice a chemical taste. This is the iodine. Iodine is a necessary nutrient which was added to salt a long time ago when it was not something that we got in our diets. I think most Americans today get plenty of iodine in our diet (I am not a medical professional and this is not a medical opinion, but just my choice for my family) so I choose to use an un-iodized salt for the food that I prepare for my family.
The cheapest kind of sea salt (about ($2.99 a pound in bulk, also can be purchased by the box in most supermarkets) can either be very fine grained like the iodized salt, or coarser, which I use in my sea salt grinder. These are usually white and are a more processed product than the most natural (and most expensive) sea salts. At my local Whole Foods store yesterday, there were about 5 gourmet salts in the bulk section. The cheapest were $6.99 a pound. I purchased a Himalayan Pink Mineral Salt which has a lovely pink hue from the iron in the water from which it is produced. The best sea salts really taste of the sea. Like when you get a snootful of saltwater, but in a good way. I also bought a Cyprus Black Lava Flake sea salt, which was $29.99 a pound. This is beautiful stuff. It is almost the color of pencil lead. The texture is very crystalline- large chunks and lovely pyramids, almost the size of the end of my pinkie finger. The black lava component leaves a sooty residue, but it really all tastes of salt. In the summer this would be stunning on some yellow or even pink heirloom tomatoes. It has a nice crunchy texture which shatters when you bite it. This is definitely a show salt. Put it on a chocolate truffle or sprinkle it just before serving on some lovely vegetables. I wouldn’t put it on an omelet (it would probably turn the whole mess grey) but sprinkled over the top might look cool.
Finally I bought some Alderwood Smoked salt. ($9.99/ pound) This is a sea salt which has been smoked with alderwood until the salt has turned a true brown color. A smoky smell and flavor dominate, along with a very salty taste. I have used this on steaks and things that I have cooked indoors, when I want to give the impression that they have been done outside. I have smoked salt in my own smoker as well, but I did not get as pronounced a smoke flavor as the commercial one I bought yesterday. On the steaks I cooked last night, the smoked salt gave them a slight smoky flavor, but I used very little salt on each one. Next time I will try using a little more.
This past summer I had the opportunity to go with my children to Austria and while there we toured a salt mine. I learned quite a bit of history about salt and learned about what an important role it played in the development of that region, the Salzkammergut. Briefly, here it is. Salt was discovered in the Alps in the Bronze Age, about 5000 years ago. Because of its importance in preserving foods, it became a valuable commodity and the people of the region, and specifically their leaders became extremely wealthy as a result. The city of Salzburg (literally Salt City) has many gorgeous cathedrals and castles and these were all built from the profits of the salt trade. Many wars have been fought over the stuff. If you ever have a chance to be in the Salzburg area with your kids, take a salt mine tour. You get to wear cool miner clothes, ride on a train and a boat and slide on giant slides (the better to get deep into the mountain with.) I did it when I was an 8 or 9 year old, still remembered it and knew my kids would love it and they did.
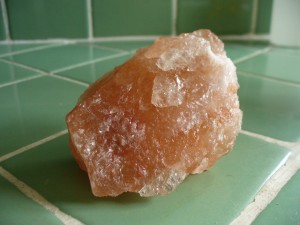
That’s a large pink salt crystal from Austria
Salt has an interesting history, and you can certainly read or learn more about it on the Internet or in the many books that have been written on the subject over the past few hundred years. But how do I use it today, in my cooking?
My rules for using salt:
- All baked goods require salt – bread will not rise properly and even sweets will not taste just right without it.
- Use salt throughout the process, not just at the end of the cooking process. I don’t generally use any salt at the table, except for something like a baked potato. When preparing something in boiling water or steam, I always salt the water before adding the product. For pasta, have the water taste slightly salty (just a hint of the sea) before adding the pasta. For potatoes, add salt to the pot with the cold water and potatoes and cook it all together.
- I have found that I use much less total salt by using it intermittently throughout the process rather than just at the end. In my opinion, when using salt to season each component throughout the cooking process and not just at the end food tastes more like it should. Mashed potatoes don’t necessarily taste salty, but rather than potatoes with salt they taste like great tasting potatoes.
- If you are adding ingredients like stocks or sauces which already have salt, reduce the amount you add to your recipe.
- Be careful with your timing when you use salt. Salt will draw the liquid out of food. Sometimes you want this to happen, for example when you use salt to draw the bitterness out of a vegetable, which is then rinsed. But if you are preparing a fresh salad, add salt just before serving to preserve the integrity of the food. Same thing goes for meats.
- If you are preparing a meat product to cook, salt just before cooking. I made some hamburgers on our trip to Florida, and everyone who had one said they were the best hamburgers ever. What did I do special, my mother-in-law wanted to know. I used ground sirloin and divided it into very thick patties. I seasoned each patty with sea salt and fresh ground pepper, and then cooked them in a skillet with about a teaspoon each of butter and olive oil, heated to medium high heat. The thickness of the patties and the salt on the outside of the burger combined to form a lovely crispy outside crust on the meat. I served them on buttered buns and voila, the best burgers ever! Easy!
- For most of the meals I prepare for my family (standard fare- chicken, steaks, hamburgers, eggs, etc) I just use salt and freshly ground pepper for seasoning, I try to buy the best quality meat and vegetables I can and prepare them in an appropriate manner (don’t undercook, don’t overcook, season them well but not to excess). It is a simple way to cook, but it lets the flavors of the food dominate. We try to eat as close to the natural state as possible.
- Salt changes the boiling point and the freezing point of water. Add salt to the water before boiling and it will raise the boiling point of the water- it will come to a boil slower, but only marginally so. Salt lowers the freezing point of water into ice – this is why rock salt is used when making ice cream. It allows the ice water mixture to come to a lower temperature (which causes the ice cream to freeze quicker.)
Class dismissed!
