May 26th, 2010

Thoughts on Seasoning

Super Sister-in-Law and Amazing Chef Sandy is back with her wisdom on the subject of seasoning today.

I always learn so much from her. Whether it’s the steak itself or the sides to that yummy steak dinner:  seasoning matters.

Class is in session . . .

Let’s face it; some meals are just better than others.  Why do some meals just resonate with us?  Sometimes it’s the company, or the setting.  But when we get to the brass tacks of the food on our plate, what makes one meal better than another?

Usually it is because of the quality of ingredients, and perfect seasoning.  The quality of the food we cook at home is dependent on using the best ingredients we can get our hands on.  Use great cuts of meat, and the best seasonal vegetables you can find.

When it comes to seasoning properly, one of the best tips I can give you is to taste what you are cooking, often.  I taste the water that I am going to cook pasta in.  Water salted for cooking any kind of carbohydrate (pasta, potatoes, vegetable) should taste slightly salty.  Not “Oh my god that’s salty” but just kind of a slight taste of the sea.  Properly seasoning the water that you cook in before you add the starch will mean using a lot less total salt in your cooking.  You may not have to add more salt after cooking and the food will taste like what it is – you want the potatoes to taste like potatoes, not salt and certainly not bland.

I taste raw asparagus before it goes on the grill.  If you are making a risotto, taste the stock and correct it for seasoning before you add the rice.  If you are making a pilaf, season the vegetables as you are sautéing them, then add perfectly seasoned stock.  Before you serve, taste the food again.  You may need to adjust the seasoning again.

For many vegetables and other starches, a little bit of acid (in the form of citrus juice – a squeeze of lemon juice, for example or a few drops of a great vinegar) added just before serving perks up the flavor in an indescribable way – it just makes the flavor fuller and brighter.  If you need a little more salt flavor, you may want to consider adding a little grated parmesan cheese or a little soy sauce to give that boost.  If you have added cheese to a dish, adding a few drops (really – less than a teaspoon) of balsamic vinegar will make the cheese taste cheesier.

When adding any kind of seasoning, add a little, taste and adjust.  We all know that it is impossible to take out seasoning when you have added way too much.  Pour salt onto the back of your hand or into a measuring spoon, not directly into a soup or stew from its container.  If you accidently dump too much you may be able to salvage your meal by quickly scooping up what you dumped in.  When you add vinegar or lemon juice, also add just a few drops at a time to enhance the flavor – no one wants their risotto to taste of balsamic vinegar.

If you have slightly over salted something like a stew or soup, one of my grandmother’s tricks was to add a few chunks of raw potatoes.  Let them cook for 20-30 minutes, and then either scoop them out or leave them in if you desire.  A few drops of acid will also help a slight over-salting.  You may be able to add more unseasoned liquid to take some of the over saltiness out.

Acid-y                                                                     Salt-y

Lemon, Lime Juice                                            Salt

Wine                                                                        Soy Sauce

Balsamic Vinegar                                              Parmesan Cheese

Other Fine Vinegars                                         Feta Cheese

Garlic

Garlic is one of the most popular seasonings used in this country, after salt and pepper of course.  Of course, garlic is really a vegetable, from the onion family.  You can buy garlic in many forms in this country – garlic salt, garlic powder, garlic in a tube, jar or from the freezer.  And then of course there is a fresh bulb of garlic, which may be intimidating to some people.  When you get familiar with the fresh form of garlic, and how easy it really is to use, you may be ready to clear all those other jars from your pantries!

First, a little terminology:

Head of Garlic/ Bulb of Garlic – this is the onion-sized whole product of garlic, which is covered by a pale, papery skin.

Clove of Garlic – each head of garlic has numerous papery-skinned cloves, usually upwards of 8-9.  These are held together with a plate at the bottom, which will be discarded.

The pungent flavor of garlic is released when the cells inside the clove are broken.  The more they are broken, the more pungent the flavor – a slice of garlic will be much less strong tasting than crushed fresh garlic.

Personally, I don’t like to bite into a chunk of garlic, so for most of my cooking purposes I use crushed garlic, although often just one or two small cloves.  I take a whole, unpeeled clove of garlic and place it on my cutting board.  Then I lay the flat side of my heavy chef’s knife over the clove, I use one hand to really pound the knife onto the garlic.  This smashing will loosen the skin from the clove, making it easy to remove.  I remove the skin, and then continue using the knife side to really crush the garlic.  If I also need a little salt in the recipe, I often add kosher salt to the garlic on my board, because the kosher salt really abrades the garlic into a paste.  Then scrape the board and the knife into my sauté pan, where I sauté the garlic just briefly over medium heat and continue with my recipe.

This salty garlic paste is also delicious added to a quantity of softened butter, for yummy garlic bread or to finish a delicious hot off the grill steak.  I use one large clove of garlic, smashed, then crushed with about a teaspoon of kosher salt (2/3 garlic, 1/3 salt) and mix this with 4 tablespoons of softened butter, plus fresh parsley, chopped, if available.

A quick and easy way to make garlic bread without smashing the garlic to smithereens is to toast good quality rustic bread.  When the toast is crunchy, simply slice a clove of garlic and rub the cut side of the clove on the toasted surface of the bread.  Spread with butter or drizzle with a little olive oil, a sprinkle of salt and pepper and you have a delicious, authentic garlic toast to go with that juicy, tender steak!

October 22nd, 2009

Steak, Moonstruck and Other Good Stuff

moonstruck

I LOVE movies — don’t you? You can lose yourself in a movie, expand your mind, or just laugh for a moment.

Super Chef Sister-in-Law Sandy is here today with her experience with the movie Moonstruck.

It involves steak, mad love and iron intake.

Intrigued? Read on . . .

One of my favorite movies is Moonstruck, with Nicolas Cage and Cher starring as a couple of Italians living in Little Italy in New York City who fall in love, despite some obstacles.  It is kind of a foodie movie, in that much of the dialogue/action revolves around the dinner table.  The two of them begin as pretty violent adversaries, and then she cooks him a steak so that they can have a civilized discussion about a family rift.

There are several interesting things about the scene that really resonate with me — the first of course being that a meal is a way to bring people together.  I am definitely a food equates to love kind of girl — a meal together is really one of the most joyous ways to get together.  I enjoy having a meal together with family or friends, and I think that preparing food together is such an intimate way to get to know people.  It just feels comfortable working together.  Think of all those awkward dates in college when you were waiting for the waiter or waiting for the food to come.  Nothing to do, nervous… yuck!  Making something from your kitchen is really a way to show people that you like them.

Another thing that I find really funny about the scene is that Cher does what she thinks is best for his character, despite what he wants.  “I’m not hungry,” he says and she replies that she is cooking him a steak.  “I like it well done,” he says.  And she says, “You’ll eat it bloody to feed your blood.”  When the food is prepared, he grunts, “It’s good.”  They eat together and work out their issues.

When I watched this again the other day, I wondered about the line “You’ll eat it bloody to feed your blood.”  From my college nutrition class, I remembered a few things about iron absorption, but not anything specifically about doneness related to iron levels.  So after a bit of research on the Internet, I came up with a controlled study done by the Institute of Food, Nutrition and Human Health, Massey University, New Zealand.  Their conclusion was that cooking beef indeed did change some of the soluble form of iron in beef to insoluble, and a greater doneness meant that more of the iron was converted to an insoluble (therefore unusable) form for human consumption.  They did conclude, though, that despite these changes with cooking, beef remains a good source of iron and a useful source of the potentially bioactive compounds taurine, carnosine, coenzyme Q10 and creatine.

If you want to maximize the amount of usable iron you get from any meal, it is important to limit tannins (found in tea, red wine and other sources) taken at the same meal, and instead enjoy your steak with some vitamin C.  How about a nice glass of lemonade or water with a splash of lime?  Also, if you eat other foods like beans, which are a good source of iron also, the steak will help you absorb iron from the other foods.

When my son was a toddler, his pediatrician diagnosed a mild iron deficiency in him.  After my first taste of the supplement recommended to me for him I knew I’d have to find a way to get his iron intake up from food sources — iron supplements taste awful, worse than any other medicine I have ever taken myself.

At the time I did lots of research into what I could to increase his iron absorption from food.  One of the simplest ways that you can increase the amount of iron in your diet is to use cast iron to cook with.  Believe it or not, a bit of the iron from the cooking vessel actually imparts itself into whatever you cook in it.  Another easy way to get iron in him was in the hot cereals aisle.  Check out some of the iron levels in those cereals.  I even used some of the boxed cereals to make muffins and baked goods — you can hide a lot of goodness in a banana chocolate chip muffin.  Now he is the biggest steak eater in the family, so not so much a problem anymore.

If you have questions about the iron levels in your blood or in your diet, please consult your health professional.  I just think it’s interesting to know the little things that we can do to increase the nutritional benefits from the food that we eat. Enjoy your steak – it’s health food!

Nutrition Facts

The recommended dietary allowance (RDA) for iron in healthy adults is 10 milligrams per day for men and 15 milligrams per day for premenopausal women. Premenopausal women’s needs are higher than men’s needs because women lose iron during menstruation.

It is generally easier for men to get enough iron than it is for women. Because they are usually bigger, men have higher calorie needs and will most likely eat enough food to meet their iron requirements. Women, on the other hand, tend to eat less. This makes it more difficult for them to meet their iron needs. It is, therefore, particularly important for premenopausal women to eat foods high in iron.

Pregnant women will need as much as 30 milligrams of iron per day. The main reason is because the unborn baby needs iron for development. As a result, it will draw from the mother’s iron stores. This can quickly deplete a woman of iron if she is not eating enough iron rich foods.

In general, meat, fish, and poultry are excellent sources. Other sources of iron include beans, dried fruits, whole grains, fortified cereals, and enriched breads.

Iron is a mineral essential for life. Found in red blood cells, iron’s primary role is to carry oxygen from the lungs to the rest of the body. Without oxygen, the body’s cells cannot function normally.

If the body’s iron stores become too low, an iron-deficiency anemia can occur. This is characterized by weakness, lethargy, muscle fatigue, and shortness of breath. In severe cases, a person’s skin may become pale due to a lack of red blood cells in the body.

Source: http://www.calories-nutrition.buddyslim.com/beef-steak/

Photo courtesy of SmackAMack.wordpress.com.


October 15th, 2009

Tips: Steak on a Charcoal Grill

Happy day! Super-Cali-Fragilistic Sister-in-Law Chef Sandy weighs in today on the use of a charcoal grill versus gas.

There are some fierce proponents of each. Here, Sandy tells us the ins and outs of using charcoal to cook that gorgeous steak. Enjoy!

612708f8-61b0-4366-a6cb-5a478b4c60cc_300

Using A Charcoal Grill

Right before Hurricane Ike hit Houston last year, my husband and I decided we needed to have a grill, just in case we lost electricity for a while.  We had left our old gas grill behind when we moved, and had planned on replacing it when we got settled in our new home.  Well, the day before a hurricane hits is no time to buy a grill, we discovered, and we were not able to find a gas grill anywhere in the Houston area.  The only thing we could find was a few bags of charcoal and a camping sized charcoal grill.

Given that there were no other options, we went with the charcoal grill and quickly learned some of the nuances which make this just a little more complicated then firing up a gas grill.  I do feel like I have mastered a few tricks which I would like to share with you, whether you are a new user, or someone who may just do the charcoal thing occasionally, like when you are camping or picnicking at a state park.

If you are a long-time charcoal griller, you’ll probably be familiar with all of this.  My intended audience is those who have not often had success with charcoal, but would like to give it a try.  Gas grills are certainly a convenient option, but if for whatever reason or preference drives you to use a charcoal grill here are some things that might help you have success.

The charcoal grill has two grates — one is intended to support the charcoal at the bottom of the grill, the other is to cook your food on.  The lower grate holds the charcoal up slightly from the bottom of the grill so that oxygen can get to the pile of briquettes.  Use about 6 total sheets of newspaper, rolled tightly into 2 rolls. Form an X at the bottom of the grill with the 2 rolls of newspaper, and place the bottom grate on top of the newspaper to hold it in place.

Next, form a pyramid of the charcoal, so that it will burn efficiently and not require too much starter fluid.  The amount of charcoal you will want to use is limited by the size of the grill, of course, but also should be determined by how much you want to cook.  A couple of burgers may only need something like 30 briquettes, but pounds and pounds of steaks and chicken will take longer to cook, therefore you will need a fire that burns longer — plus more briquettes.

Once you have a nice square pyramid (ask your fourth grader!) squirt the pile with the recommended amount of lighter fluid.  Don’t forget to read the package.  It is usually just a couple-second squirt.  Don’t be that guy who squirts half a bottle of lighter fluid onto a pile of burning charcoal – this is dangerous and foolish and stinks!  Put the top back on the bottle and put it far from the fire, before you light a match.  Light the ends of your paper tubes, which should fairly quickly catch the pile of briquettes on fire.

After about 20 minutes, when the briquettes are covered with ash and the flames have died down, use a fire-proof implement to spread the hot charcoal evenly on the grate.  Please use every safety precaution.  Sparks can and will fly up.  Replace the clean cooking grate on top of the hot charcoal and you are ready to cook.

Enjoy the smokier flavor that charcoal grilling imparts to your food — you may become a convert!

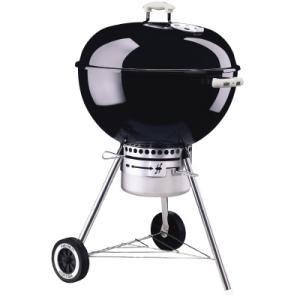
Photo of Weber charcoal grill courtesy of HomeDepot.com.


Archives