August 19th, 2009

Steak Recipe: Bleu Cheese Crusted Filet

Bleu Cheese Crusted Filet

So, a couple of weeks ago I received a question from a reader asking about a recipe for a filet mignon encrusted in bleu cheese.

This, of course, was a new one on me so I posed the question to Super Sister-in-Law Chef  Sandy.

And, as expected, she used to prepare this delectable dish when she toiled in the kitchen of the Ritz-Carlton.

Here, she shares her secrets for making it just like the pros!

(And check out that picture she took — isn’t it to die for???)

Here’s what she has to say . . .

Recently I was asked a question about how to make a bleu cheese crusted filet like someone’s favorite restaurant did it.  There are several ways to do this, depending on the outcome you are looking for.

You can simply cook your steak to desired doneness via any combination of direct and indirect cooking that works for you (sauté/oven, over the hot coals/on the side) and then simply top the steaks with bleu cheese for a moment, just like you would top a cheeseburger, thereby insuring a gooey topping.  Or, you could put the whole thing in a fiery hot oven which would brown the cheese.  My favorite method is the one below. You make a cheese crust, using breadcrumbs, butter and seasonings, in addition to bleu cheese.  You could even add pecans or walnuts to this versatile topping, or substitute another cheese if you like.  Just keep the ratio about ½ breadcrumbs and ½ other stuff.  Plus enough melted butter to hold it together. This mixture is finished on top of the steaks and you get a crunchy, cheesy topping which I think is a great contrast to the very tender steak.

Bleu Cheese Crusted Filet of Beef

2 5-6 oz Tenderloin of Beef Steaks (Filets)

Salt and Pepper

½ cup panko (Japanese style) bread crumbs, or fresh breadcrumbs

1 Tbsp butter

½ tsp garlic or onion salt, or

1 tsp kosher salt, if desired

4 turns fresh ground pepper

1 teaspoon minced fresh herbs, such as rosemary or parsley

½ cups crumbled bleu cheese

1 teaspoon Dijon-style mustard

Canola or Peanut Oil, for searing

Allow the steaks to set at room temperature for about 30 minutes to equalize the internal temperature for more even cooking.

Meanwhile, prepare crumb topping:  Combine panko or fresh bread crumbs and cold butter in microwaveable bowl.  Season with flavored salt or kosher salt and pepper.  Heat on high in microwave until butter melts, stirring every 30 seconds to distribute the browned crumbs.  Remove from microwave, allow to cool for a few seconds and add the herbs and bleu cheese.  Use a fork to distribute the bleu cheese into the crumbs without making it into a paste.  Taste for seasoning, set aside.

Preheat oven to 500°F.

Just before searing, season the filets with salt and pepper.

To sear the meat, preheat shallow sided sauté or frying pan over medium high heat until it is very hot.  Add 1 teaspoon canola oil and heat until the oil is shimmering.  Without crowding them, carefully add the steaks to the hot pan.  Do not move them for about 90 seconds, in order to ensure a nice crust.  Using tongs, carefully brown all sides of the steak, each time allowing the crust to form before disturbing the steaks.

When well-seared, remove steaks to an open baking pan to rest until the final cooking.

Everything may be prepared ahead up until this point, as much as a day in advance.  Allow steaks to come to room temperature if they are cooked ahead and refrigerated.

When you are about 10 minutes out from serving time, finish the steaks in the preheated oven. The time this will take will depend on the doneness you desire and the thickness of your steaks.  For the 6-oz filet pictured, which was a traditionally shaped (i.e. tall) filet, prepared medium rare, about 8 minutes of total oven time was required.

First, put the steaks into the oven for 5 minutes without topping.  Then remove from the oven and carefully brush mustard onto steaks to allow the crumb mixture to adhere. Just a thin coat — you may not need all of it, depending on the surface area to cover.  Then simply divide the crumb mixture over the steaks and return to the oven.  Watch carefully, they will burn quickly.  Check after 2 minutes; my steaks took about 3 minutes to get the topping brown and bubbly.

Allow the steaks to rest a minute as you prepare the plates for service, then serve and enjoy!

June 26th, 2009

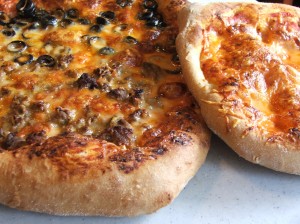
Pizza. Beef. Scrumptious.

We’ve talked about sprinkling your homemade pizzas with the heaven we call beef before. But here’s Sandy’s take on doing it at home with the kids.

What could be more fun than creating a meal this summer with the kids that the whole family will love?

Here’s her story — and her photo (you may drool now) . . .

sandyssteakpizza

Pizza with the Kids

So school’s out for summer where we are, and after a week at Nana’s house, my kids are back in town, and I am back in charge of their fun.  The first “official” day of summer was Monday, and I had great intentions of having my five and nine year olds make Objectives and Goals for the summer.  So it went great…. 

Surprisingly, nothing got resolved, so I have made my own projections of summer ideas and decided that one of the things we can do is work together to make some of our meals.  Somehow, even though it is often more work that way, at least I feel like they are a part of it and we are doing something useful and educational.  Plus I feel a little less like a servant to their needs and more like a developer of their potential as humans.

Although they both like to cook, I am sure that oftentimes they would like to just play with their new videogame system, and the big one can certainly entertain himself in his room with a stack of new books from the library.  But this is my plan!

One of the books I checked out is a giant cookbook, and we have made chocolate chip cookies and pizza together from this book.  I must say that the cookies were extraordinarily good, despite the fact that the only chips I had were the swirled white chocolate/ semi sweet chocolate ones (and I think they’re too sweet).  I even snuck a little healthiness into the cookies (which I am wont to do), by substituting King Arthur White Whole Wheat Flour for part of the all purpose flour called for in the recipe.  The book we got was Baking Illustrated, The Practical Kitchen Companion for the Home Baker by the editors of Cooks Illustrated Magazine and the recipe was for Thick and Chewy Chocolate Chip cookies.  The interesting thing about the book is that it has a little essay, for want of a better word, before each recipe, detailing how it is they came to it.  What they started with, how they tweaked the recipe, what each small change did to the final outcome. 

So my nine year old read the essay, which is kind of a description of the scientific method, when I think of it.  It explained why they used melted butter instead of whole butter, the ratio of brown to white sugar they used, and so forth.  The same basic ingredients as the standard back of the package recipe, but the ratios were tweaked a little, and I must say that they were some tasty, good looking cookies.  So I can call this a science lesson, too, right?

Then last night, we made pizza together.  My big boy helped me make the dough, measuring ingredients and turning on the standing mixer.  He also shaped the finished dough into a ball and helped make the pizza crust.  I taught him how to dice an onion, which he then sautéed with the sausage and ground beef topping.  The five year old helped us top the pizza and made sure we made one with her favorite toppings (olives!).  They were some gorgeous looking pizzas, despite the fact that I do not have a pizza stone in my oven and I do have the worlds’ worst oven to work with.  It is totally unreliable, as far as temperature goes, and has no insulation, which means that in the Houston summer, it is insane to make pizza.  Insane but good.  It must have been 125° in the kitchen by the time we were done – the oven was preheated to 500° for 30 minutes, and I am telling you our oven has no insulation on it – you could fry an egg on the top of it.  So my new plan for pizza making in the summer is to get another pizza stone (I had one for years and just haven’t replaced it after it cracked) and put it on the grill, where I will get it fiery hot, by preheating, then put the pizza on top and let it cook with the top on the grill for 6-10 minutes.  I have tried doing pizza right on the grill grate, but I am yet to end up with a satisfactory product.  The bottom crust gets too burned for my taste, and I end up cutting it off, which is not easy, nor pretty.

The picture of the pizza in the cookbook (which has gorgeous illustrations and pictures) was of a much thinner crust than we were able to accomplish.  This is something we’ll have to practice technique on, but this is definitely the best pizza we have ever made at home.  It was tasty, the crust was delicious if not perfectly round.  Thinner crust is more popular with my family, particularly my husband, so we will have to get our crust shaping technique down to more of a science.  The one thing I really noticed besides its yumminess is that I did not notice all of the salt that I get from takeout pizza.  Ever notice that an hour or so after takeout pizza, you are so thirsty you can hardly stand it?  Our pizza had kind of the opposite issue.  I almost wish it had a little more salt – I will probably add a titch more to the dough recipe next time, and maybe go with a non-organic mozzarella which may have made it a little bland.  All said, a pretty good week in cooking school ala Mom.


June 25th, 2009

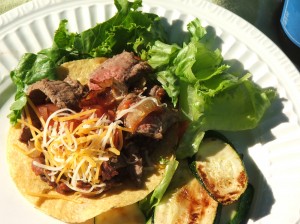
Steak Chalupas!

So, we’ve been talking a lot about what to do with leftover steaks. Sister-in-law Chef Sandy has a fantastic idea for steak chalupas you can make from any steak you have in the fridge.

Check out what she has to say!

holymolysteakchalupas

Leftover Steak Chalupas

When I cook, I like to cook green and thriftily.  Healthy, conscious of our environment, not wasteful of food or energy resources (or my own efforts.)  So if I am firing up the grill, I like to make sure that I am using most of the square footage (square inchage, to be exact…) of the heated grill grate.  Often times we end up with leftovers, which just happens to make the next nights’ dinner easier, right?  Who can argue with that? 

This week we had t-bone steaks from the grill one night, standard meal with baked potato and salad.  I had purchased an extra one, knowing exactly how much would fit on our grill.  The one very large t-bone that I knew was going to be leftover from our meal I took off the grill a little early – a little rare for our liking, because I knew it was going to be heated up when it made an appearance later in the week.

Two nights later, when time was short and everyone was hungry, I just had to heat up some chalupa shells in the oven for 5 minutes, heat up some black beans with salsa in the microwave and toss together a quick Mexican-inspired salad to make a tasty treat.  I did sauté some onions, and would have added a bell pepper if I had had one handy, then while they were cooking I sliced up that leftover steak and added it to the hot skillet just for a second to warm up the meat. 

Dena here again. I always marvel at how Sandy (and so many of you!) can think outside the box. I love the standards, but I can easily get stuck making the same things over and over again.

Boring, right?

That’s why I need this blog. And Sandy. And you. To help me keep it fresh and interesting around here.

Thanks for the ideas!!


You are currently browsing the archives for the Tips from Sandy category.

Subscribe

Subscribe in a reader
(or) Subscribe via Email


About Me

Hi! My name is Dena P., and I love steak. In fact, I’ve been on a quest for the perfect steak for a few years now.

I love experimenting with food and I like to get my family, friends and neighbors involved. They add a lot to my cooking experience by helping me perfect techniques and sharing recipes.

Read More About Me »

Steak Widget

Archives