January 14th, 2009

Tacos 2.0

If you’ve been reading this blog, you know my sister-in-law Sandy takes every meal to another level of flavor-infused goodness.

Even something like tacos become THE BEST TACOS YOU’VE EVER HAD.

taconight

Here, Sandy tells us just what she did to wow our family with a smorgasbord of flavors, colors, and amazing scents — all the things that make a great meal.

Taco Night.  Our first meal in Florida as a large group came together pretty quickly.  Nothing fancy, but everyone really enjoyed it.  I think there were about 14 of us on taco night, and this meal came together in less than an hour. 

I think the secret to good tacos is using good quality beef and cooking it well, without quite as much seasoning as those little packages suggest you use.  Try using a little less (I use only about a third a package per pound of meat) and seasoning the meat with a little salt and fresh ground pepper and your favorite salsa or picante sauce.  This is a super quick meal that is fun for a crowd, and can really be put together very quickly if you get organized.  Do all of your chopping to start, then start on what takes longest.  Get your guests to help – chop garnishes, make margaritas, etc.

0.  Prep Garnishes and/or recruit volunteers to prep garnishes and get drinks going.


1. Begin Rice.  Dice all of the onions needed for the recipes (1 ½) and peel and dice carrot for rice. Start rice pilaf by cooking vegetables, and then adding rice, cooking liquid and bring to a boil. Reduce to a simmer, cover and set timer for 20 minutes. 


2. Begin Black Beans and Taco meat  : chop bacon and add to cold frying pan. Turn heat to medium and cook bacon until brown, add beans and picante sauce and cook over low heat until thoroughly warmed thru and beans are tender.  Meanwhile, heat oil and begin taco meat preparation as directed below. Add liquid to beans as necessary to prevent beans from burning. Mash beans as desired with potato masher, fork or handheld blender.


3. Preheat oven for crispy taco shells when the rice has just a few minutes left.  The taco shells take less than 5 minutes to warm up- don’t let these suckers burn, they go quickly!

Quick Tacos for a Crowd

1 Tbsp Canola or vegetable oil

1 medium onion, diced small

3# Ground Beef, 85%-95% Lean Ground Sirloin or other good quality Beef

1 ½ teaspoon kosher salt

1 teaspoon fresh ground pepper

1 pkg taco seasoning (for 1# ground beef)                                                                                

Heat oil over medium/high heat in large heavy bottomed skillet or saucepan until shimmering, then add onion and cook until translucent.  Add ground beef, salt and pepper.  Cook until ground beef is brown.  If there is excessive fat, beef may be drained at this point.  Add taco seasoning and water as directed on package.  Cook as directed, adding salt and pepper and or hot sauce as necessary and to taste.

Scrumptious “Refried” Black Beans

6 strips bacon, chopped

2 cans black beans or “refried” style black beans

½ cup picante sauce or salsa

½ cup cheddar or Monterrey jack cheese


Spanish Style Rice

2 carrots, peeled and diced

½ onion, diced

1 package yellow rice, plus water for package directions (may substitute ½ cup picante sauce for ½ cup of the water called for on the package directions)


Taco bar Condiments:

Shredded Lettuce

Diced Tomatoes

Salsa

Diced Avocado or Guacamole

Shredded Cheese

Crunchy Taco Shells

Tortilla Chips


January 7th, 2009

A Sandwich is a Sandwich, but a Manwich . . .

. . . is a MEAL.

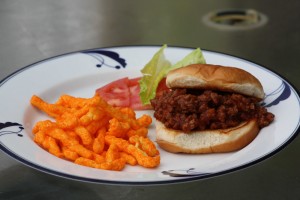
manwich

That’s how the old slogan goes. And we decided to test it out.

It’s so easy to make this Sloppy Joe recipe, even a monkey could do it. Although, for liability reasons, you really wouldn’t want a monkey messing around in your kitchen.

Just brown a pound of ground beef in a skillet until it’s no longer pink and drain.

Then, mix in a can of Manwich and stir until it’s mixed through and hot.

Serve the mixture on hamburger buns and you’re done!

Sandy toasted our buns in a little butter on a skillet, but she’s like that. She has to go and make absolutely EVERY meal extra delicious.

mymanwich

Did I mention Cheetos were on the menu too? Who doesn’t like a Cheeto every now and then?

This was such a quick and easy lunch and it was a big hit for us beef-eaters. My eight-year-old nephew ate two of them.

Does that make him a REAL MAN now?

For that matter, if I ate one does that make ME a man?

I’m so confused . . .

Top photo and recipe courtesy of ConAgraFoods.com.


January 3rd, 2009

The Tenderest Tenderloin — Is That a Word?

tips2 

While we were on our holiday vacation Sandy prepared a number of meals that dazzled us all.

I helped if you count handing her a spatula and stirring sauces while sneaking tastes as “helping.”

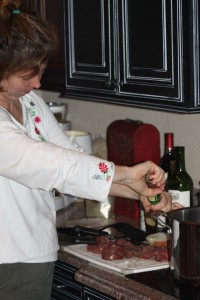
<em><strong>Sandy seasoning the meat</strong></em>

Sandy seasoning the meat

I did soak it in and I learned quite a bit — as I always do around her. So, she’s written down her “tips” for making the most tender of tenderloin tips in a delicious red wine sauce. Now we can all refer back to her thoughts when we’re in our own kitchens trying to recreate the yummy goodness she masterfully put together.

These really were so flavorful and the smell filled the house with great anticipation before the meal was ready. We didn’t have to find anyone to tell them dinner was on. They were all salivating around the periphery of the kitchen, waiting to pounce.

May your crowd do the same!

Here’s what Sandy says . . .

This is one of those really flavorful quick dishes that you can prepare pretty easily with a great cut of meat like tenderloin tips.  This recipe can also be prepared with a tougher cut of meat (i.e. stew meat) but the meat would have to simmer for 2-3 hours in the sauce in order to tenderize it.  In the following recipe, the tenderloin tips are browned first in batches to insure a good crust on each piece of meat.  When the sauce is totally finished and the side dishes are completed, table set, etc. the meat is added to the sauce just for a few minutes to re-warm and to cook to desired doneness.

When browning the ingredients, using a lower (medium) heat is intended to prevent the bottom of the pan from getting too brown or burning.  If at any point the fond (that brown stuff on the bottom of the pan) is getting really brown, go ahead and use a little wine to deglaze the pan.  Just pour in a little, use a wooden spoon to loosen all the brown bits.  Pour this liquid in the casserole dish with the ‘done’ items – it will become part of the delicious sauce.  If the fond gets really dark, smells burned or even just starts to burn, use water to deglaze the pan, and just dump this little bit of liquid into the sink.  Clean the pan well and then add fresh oil, heat to smoking and begin again.  You never want to cook meat in a pan that already has burned on the bottom, and you don’t want to make a sauce from a burned fond.  You are building up layers of flavor, and the burned flavor will overpower all. 

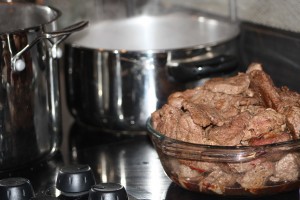
Beef ready to be added to sauce

If you do choose to prepare with a different cut of meat which requires longer cooking, reserve the bacon, adding it just before serving (or leave it out).


Tenderloin Tips with Red Wine Sauce
 

(Serves 10)

6 slices bacon, cut into 1 in pieces

1 large onion, diced

8oz mushrooms, sliced

Canola or vegetable oil as needed

3 # Tenderloin Beef Tips, cut into like-sized pieces

Kosher Salt, pepper

1-2 cups of a nice quality fruity red wine, i.e. Merlot or Pinot Noir

2 ½ cups good quality well seasoned beef stock (2 cans Campbell’s Beef Consommé)

3 Tbsp Flour

4 Tbsp Water

In a heavy-bottomed large pan over medium heat, brown bacon pieces.  When they are crispy and brown, remove to a glass casserole.  Add onions to the bacon fat mixture and cook until golden brown.  Add mushrooms, seasoning with 1 teaspoon salt and a few grinds of fresh pepper.  When mushrooms are thoroughly cooked, remove to glass casserole dish with the bacon pieces.   Turn heat up to medium high and add about a teaspoon of canola oil, or enough to lightly coat bottom of the pan.  Season beef with salt and pepper, add first batch of beef pieces, only enough to barely cover bottom of pan.  Each piece should have its own piece of pan ‘real estate’ to cook in.  Allow to brown on first side for 1-3 minutes, or until nice and brown, then turn carefully with tongs.  When beef is brown on all sides, remove to casserole dish.  Repeat with remaining beef until it is all browned.  At any point, if the fond in the pan is too brown, clean the pan as directed above.

This is what was happening outside while we were cooking inside

This is what was happening outside while we were cooking


Add remaining wine to the pan and cook over medium heat, using a wooden spoon to help deglaze the pan.  Cook a few minutes until wine is reduced by half.  Add beef stock.  If using a canned product, I usually add a few small pieces of carrot and onion to the stock at this point to remove the canned flavor.  Cook the sauce 15 minutes or so at a gentle simmer, tasting for flavor.  If you want, remove carrot and onion pieces from sauce before serving. Meanwhile, prepare either egg noodles or mashed potatoes or rice to enjoy with your beef tips.  Prepare a green vegetable.  Have a glass of wine. 

To thicken the sauce, prepare slurry from the flour, slowly adding the water and stirring until no lumps remain.  Add more water until the slurry is the consistency of heavy cream – then add this mixture to the simmering sauce.  Stir constantly until the slurry is mixed into the sauce.  It will begin to thicken as soon as the sauce boils, but should be gently cooked for an additional five minutes or so to cook out the flour taste.

5 minutes before serving, add beef, mushrooms, meat juices, bacon and onion to the sauce mixture to re-warm and complete cooking.  5 minutes should be about right for medium doneness – test.

Serve over buttered noodles with a green vegetable for a gorgeous and flavorful company-worthy meal.

Oh, yum. See the martini?

There will be more to come  . . .  we’ll talk soon!


Archives